
How to Trim Video in iMovie (Mac, iPhone, iPad)
How to trim video in iMovie on Mac and iPhone: shorten a clip's ends, split it, cut a section out of the middle, and trim to the exact frame.


To trim video in iMovie, select the clip and drag its start or end edge toward the middle: on Mac, drag the clip's edge in the timeline; on iPhone and iPad, tap the clip and drag the yellow trim handles. To remove a section from the middle, split the clip on both sides of it and delete the piece in between.
That covers most edits. The rest of this guide goes through every trimming tool iMovie has on Mac and iPhone, how splitting works, how to trim to an exact frame, and why a clip sometimes refuses to get longer.
Disclosure: We make BlitzCut, a video editor for Mac, iPhone, and iPad. Steps below follow Apple's current iMovie guides (iMovie 10.4.4 for Mac and iMovie 3.0.6 for iPhone and iPad), checked in November 2026.
Trim, split, or cut: which one do you need?
People use "trim", "cut", and "split" for different things, and iMovie has a separate tool for each:
| You want to | Tool to use | Mac | iPhone and iPad |
|---|---|---|---|
| Shorten the start or end of a clip | Trim | Drag the clip's edge, or the clip trimmer | Drag the yellow trim handles |
| Keep only one section of a clip | Trim to a range | Hold R, drag a range, Control-click > Trim Selection | Trim both handles inward |
| Remove a section from the middle | Split twice, then delete | Modify > Split Clip (Command-B) | Actions > Split |
| Cut one clip into two | Split | Modify > Split Clip (Command-B) | Actions > Split, or swipe down over the playhead |
| Fine-tune where two clips meet | Precision editor | Window > Show Precision Editor | Not available |
| Make the whole video shorter | Trim and split each clip, then check the total | Timeline shows total length | Timeline shows total length |
Trimming in iMovie doesn't delete anything from your original file. The hidden frames are still there, which is why you can drag a trimmed edge back out later.
How to trim video in iMovie on Mac
Apple's guide to trimming clips on Mac lists four ways. Start with the first; use the others when you need more precision.
1. Drag the clip's edge (fastest)
- Skim to the start or end of the clip you want to change.
- Drag the clip's edge toward its center to shorten it, or away from the center to lengthen it.
You can only lengthen a clip if it has unused frames on that side.
2. Use the clip trimmer
The clip trimmer shows the whole source clip, with the unused parts dimmed, so you can see exactly what you're cutting.
- Select the clip in the timeline.
- Choose Window > Show Clip Trimmer, or press Command-\.
- Drag either edge to shorten or extend the clip. Or drag the clip from its center to slide which part you're using without changing its length.
- Press Return to close the trimmer.
3. Trim to a selection
Use this when you know exactly which part you want to keep.
- Hold down the R key and drag across the clip to select the frames you want to keep. A yellow border with handles appears around the range (Apple: select part of a clip).
- Drag the yellow handles to adjust the range if needed.
- Control-click the clip and choose Trim Selection, or press Option-/ (Option-Slash).
A range can't cross from one clip into the next.
4. Use the precision editor
The precision editor is for adjusting exactly where one clip ends and the next begins.
- Double-click the edge between two clips, or select the edge and choose Window > Show Precision Editor (Command-/).
- Drag the edit line to move the cut point, or drag either clip to change its length.
- Press Return to close it.
Trim frame by frame on Mac
Press the Left Arrow or Right Arrow key to move the playhead one frame at a time (Apple's iMovie keyboard shortcuts). Park the playhead on the exact frame, then split there (Command-B) and delete the unwanted piece. This is more precise than dragging an edge with the mouse.
How to split video in iMovie on Mac
From Apple's guide to moving and splitting clips:
- Select the clip in the timeline.
- Move the playhead to where you want the cut.
- Choose Modify > Split Clip, or press Command-B.
The clip becomes two clips you can move, trim, or delete separately.
Cut a section out of the middle (Mac)
- Move the playhead to the start of the part you want to remove and press Command-B.
- Move the playhead to the end of that part and press Command-B again.
- Click the middle piece and press Delete.
The clips on either side close the gap automatically. Play across the cut to check it doesn't land mid-word.
How to trim video in iMovie on iPhone
From Apple's iPhone guide to arranging clips:
- Open your movie project.
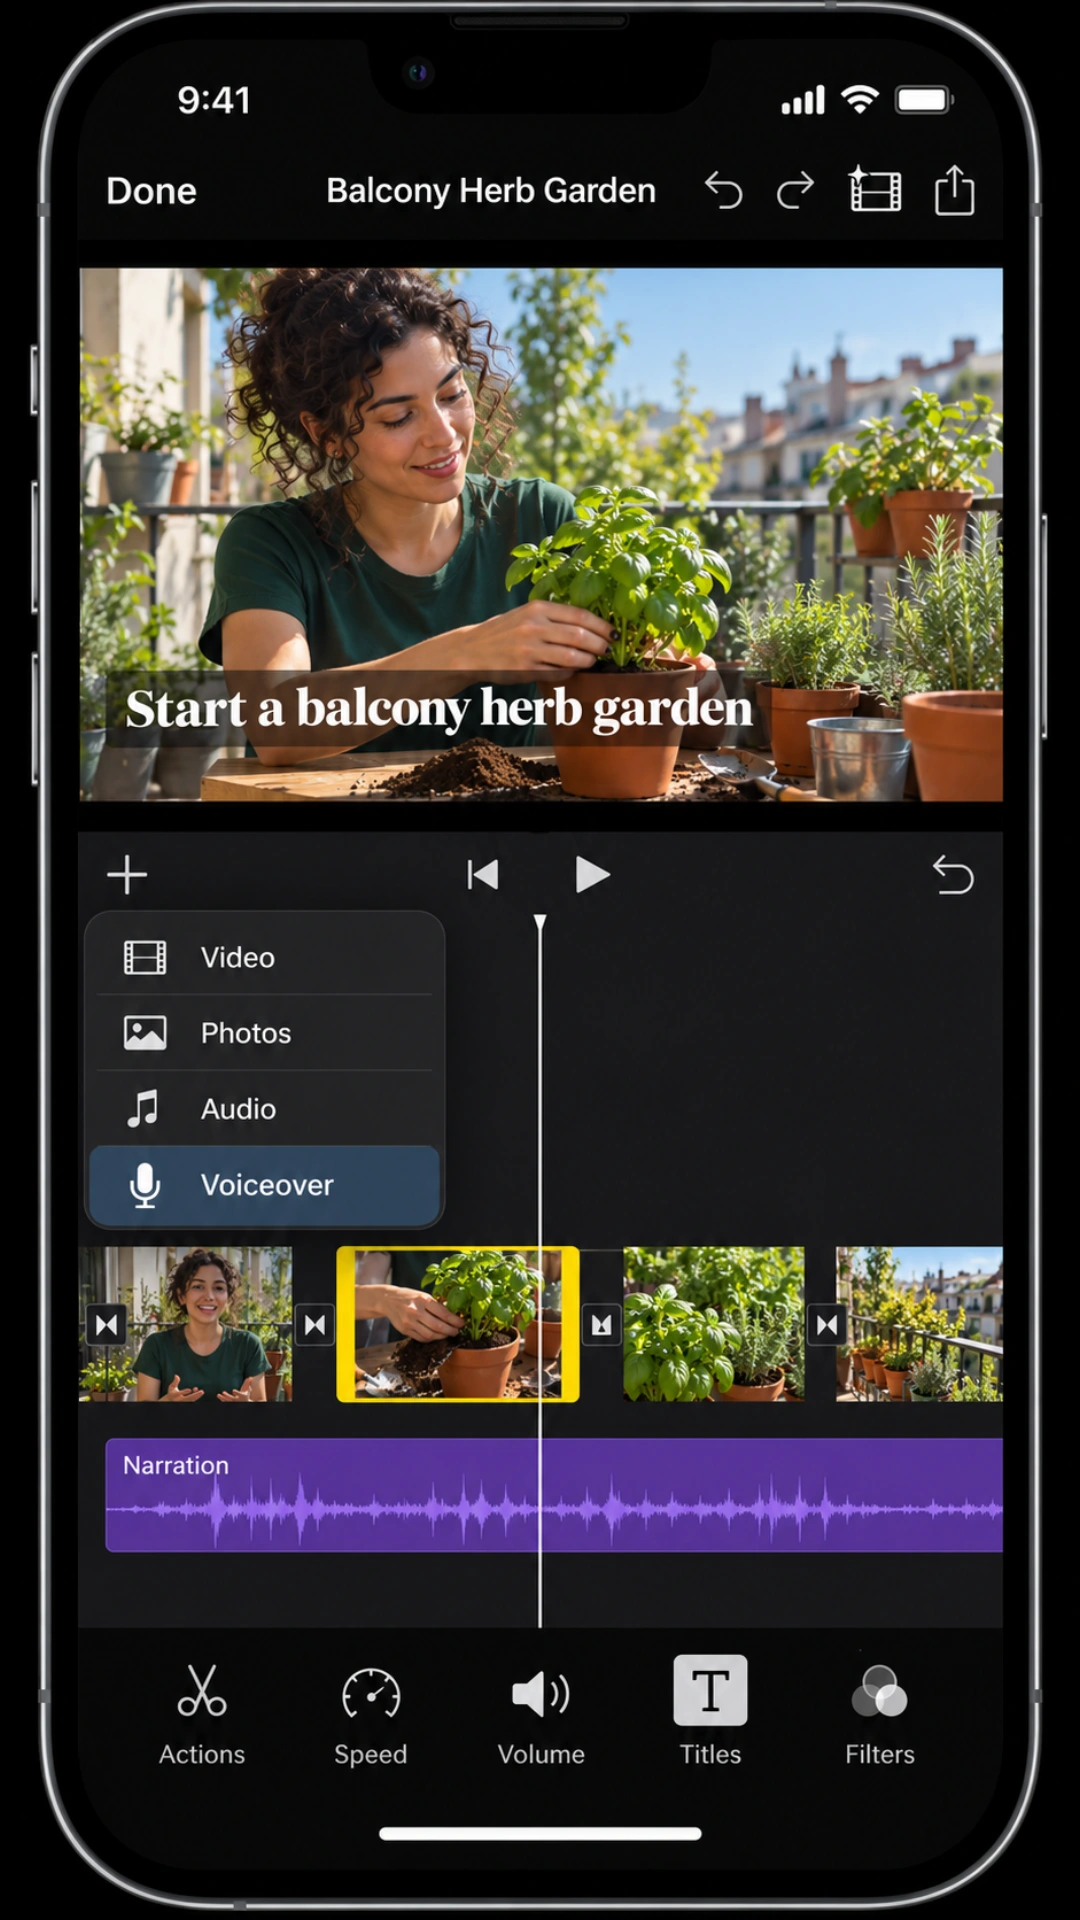
- Tap the clip in the timeline. It gets a yellow outline.
- Drag the yellow trim handle at either end of the clip toward the middle to shorten it.
If a handle won't move outward, there are no more frames on that side. For finer control, pinch open in the center of the timeline to zoom in, which makes each clip wider and the handles easier to place (Apple: navigate in the timeline).
How to split video in iMovie on iPhone
- Scroll the timeline so the playhead sits where you want the cut. It can't be at the very start of the clip.
- Tap the clip, tap the Actions button (scissors), and tap Split.
- Or, faster: tap the clip so it has a yellow outline, then swipe down over the playhead, like slicing it with your finger.
iMovie puts a None transition (a straight cut) between the two pieces. You can tap it to change it.
Cut a section out of the middle (iPhone)
- Split at the start of the part you want to remove.
- Split again at the end of it.
- Tap the middle piece and tap Delete, or press and hold it and drag it out of the timeline until you see a puff of smoke.
The deleted piece is gone from the project but your original video stays in your library.
Trimming in Magic Movie and storyboard projects
Magic Movie and storyboard projects have their own trim buttons (Apple: edit clips in Magic Movies and storyboard projects):
- Tap the clip, then tap the right arrow.
- Tap Edit at the bottom of the screen.
- Drag the clip to put the playhead where you want the cut.
- Tap Trim from Start, Split, or Trim from End.
How to trim video in iMovie on iPad
iMovie on iPad works the same way as on iPhone: tap the clip, drag the yellow trim handles, and use Actions > Split to cut it. The bigger screen makes the handles easier to grab, and pinching the timeline works the same way.
Common trimming problems in iMovie
The edge won't drag any further. You've reached the start or end of the source clip. There are no hidden frames left on that side.
I trimmed too much. Trimming is non-destructive. Drag the edge back out, or press Command-Z on Mac or tap the undo arrow on iPhone.
The cut lands in the middle of a word. Zoom into the timeline and turn on audio waveforms (on Mac, Settings in the upper-right of the timeline > Show Waveforms). Cut in the flat part of the waveform, where nobody's talking.
The audio jumps at the cut. A hard cut between two takes can pop. Add a short cross dissolve, or on Mac use the precision editor to move the audio edit point separately from the video.
Split is greyed out on iPhone. The playhead is at the very start of the clip, or you've selected a photo. To split a photo, Apple says to duplicate it instead.
My video still feels long. Trimming the ends doesn't remove the pauses in between. For talking videos, the dead air between sentences is usually what makes it drag.
Trimming a talking video? Remove the pauses automatically
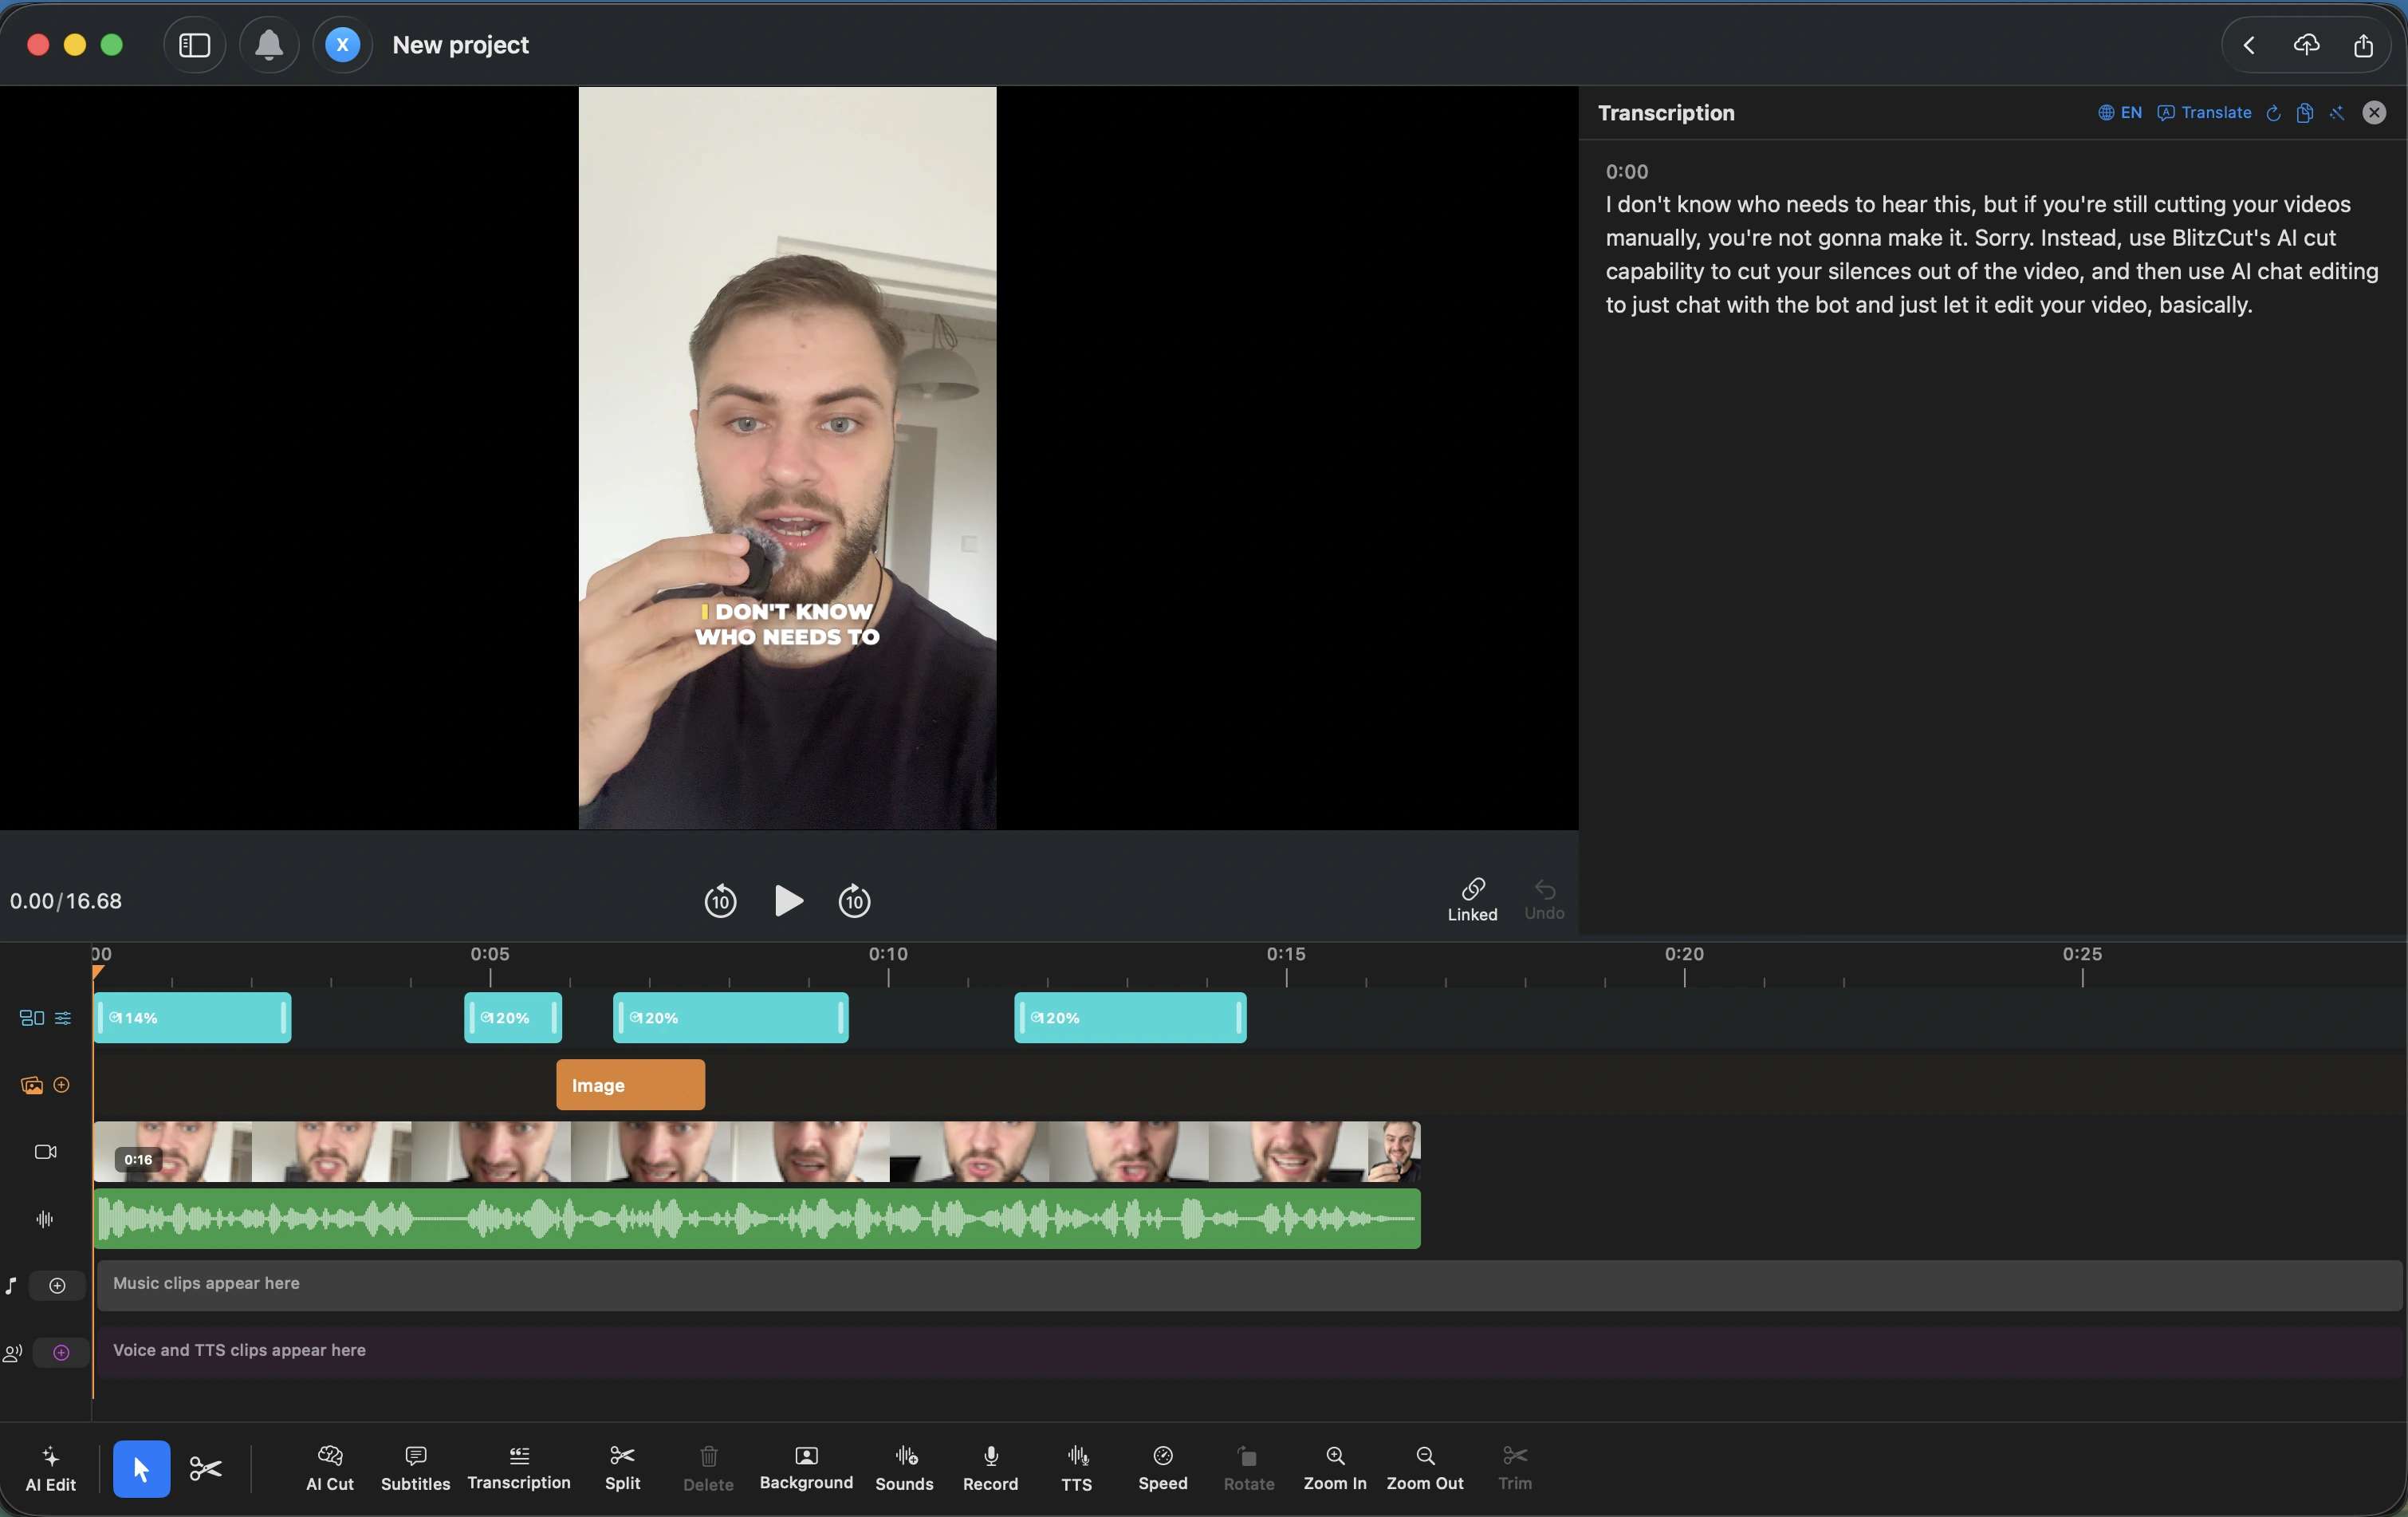
If you've filmed yourself talking, most of the trimming is finding every pause and retake, then splitting twice and deleting, over and over. In a 10-minute recording that can mean dozens of cuts.
BlitzCut does that part for you. Run AI Cut and every pause and stretch of dead air is cut in one pass, with adjustable padding around speech so the cuts don't feel clipped. Then fix what's left by editing the transcript: delete a word or sentence and that footage is cut. The timeline is still there for manual trims and splits.
BlitzCut runs on Mac and on iPhone and iPad (BlitzCut for iOS), with a free 3-day trial. For the full comparison, see BlitzCut vs iMovie.
Other quick ways to trim without iMovie
- Photos on iPhone: for trimming just the start and end of one video, you don't need iMovie. See how to trim a video on iPhone.
- QuickTime Player on Mac: open the video and choose Edit > Trim to cut the start and end, then save.
- Shortening without speeding up: see how to shorten a video for cutting a video down to a time limit.
Frequently Asked Questions
How do I trim a video clip in iMovie?
On Mac, drag the start or end edge of the clip in the timeline toward its center. On iPhone and iPad, tap the clip and drag the yellow trim handles inward.
How do I cut out the middle of a clip in iMovie?
Split the clip at the start and end of the part you don't want, then delete the middle piece. On Mac, split with Command-B; on iPhone, tap the clip, tap Actions, then Split.
How do I split a clip in iMovie on Mac?
Select the clip, move the playhead to where you want the cut, and choose Modify > Split Clip or press Command-B.
How do I split a clip in iMovie on iPhone?
Move the playhead to the cut point, tap the clip, tap the Actions (scissors) button, and tap Split. You can also swipe down over the playhead on a selected clip.
Does trimming in iMovie delete the original video?
No. iMovie hides the trimmed frames but keeps the original file. You can drag a trimmed edge back out at any time.
How do I trim video in iMovie on iPad?
The same way as on iPhone: tap the clip, drag the yellow trim handles, and use Actions > Split to cut it.
Why can't I make my clip longer in iMovie?
You've already reached the start or end of the original clip, so there are no extra frames to bring back.
Related: How to Add Text in iMovie · iMovie Vertical Video · How to Trim a Video on iPhone · How to Export iMovie to MP4 · How to Add Music to iMovie
Editing a talking-head video?
BlitzCut is available on Android, iPhone, iPad, and Mac. It is designed for recorded UGC-style videos, founder-led ads, tutorials, and testimonials and other talking-head content.
Try it for freeRelated Articles
Keep Reading

How to Add Captions to Instagram Reels (Automatically)
How to add captions to Instagram Reels: use the Captions sticker for free auto captions, or burn in styled word-by-word captions with Edits, CapCut, or BlitzCut. Steps for each.

How to Add Captions to a Podcast Video on Mac
How to add captions to a podcast video on Mac: burned-in captions for TikTok, Reels, and Shorts clips, and SRT subtitles for full YouTube episodes. Steps for BlitzCut, Descript, and Final Cut Pro.

How to Add Subtitles to a Video on Mac (Automatically)
How to add subtitles to a video on Mac automatically with Final Cut Pro, Premiere Pro, CapCut, or BlitzCut, plus a free method using MacWhisper and HandBrake. iMovie can't do it.