
How to Add Text in DaVinci Resolve: Text, Text+, Titles and Subtitles
How to add text in DaVinci Resolve 21: Text vs Text+, the Cut page, Fusion Titles, lower thirds, animated text, subtitles, styling, and fixes for common text problems.


To add text in DaVinci Resolve, open the Edit page, click Effects in the top-left, choose Titles, and drag Text or Text+ onto a video track above your clip. Then select the title on the timeline and type your words in the Inspector. That works in the free version and in Resolve Studio.
The rest of this guide covers which title type to pick, how to add text on the Cut page, how to use Fusion Titles and lower thirds, how to animate text, how subtitles work, and how to fix text that won't show up or won't edit.
Disclosure: We make BlitzCut, a Mac, iPhone, and iPad editor for talking-head videos. Steps below were checked against DaVinci Resolve 21, the current version in November 2026. Resolve 19 and 20 use the same menus for everything here.
Text vs Text+ vs Fusion Titles vs Subtitles
Resolve gives you four ways to put words on screen. Picking the right one first saves you from rebuilding the title later.
| Text | Text+ | Fusion Titles | Subtitles | |
|---|---|---|---|---|
| Where to find it | Effects > Titles | Effects > Titles | Effects > Titles > Fusion Titles | Subtitle track (Effects > Titles > Subtitle) |
| Best for | Quick titles, captions on a single shot | Styled titles, animated text, layered outlines and glows | Ready-made animated titles and lower thirds | Dialogue captions that viewers can turn on or off |
| Styling | Font, color, stroke, drop shadow, background box | Up to 8 stacked shading layers: fill, outline, shadow, glow | Template controls in the Inspector | Font, color, outline, shadow, background per track |
| Animation | Keyframes on position, zoom, opacity | Write On, per-character styling, keyframes, Fusion | Animation built in | Optional animated subtitle styles |
| Edit on the Fusion page | No | Yes | Yes | No |
| Free version | Yes | Yes | Yes | Manual subtitles yes; generating them from audio needs Studio |
Plain Text is the fastest option for a word or a line. Text+ is a Fusion-based generator, so it has far more styling and can be opened on the Fusion page for detailed animation (TourBox's comparison has a good side-by-side). If you only need a lower third or a quick animated title, a Fusion Title template is usually faster than building one.
How to add text in DaVinci Resolve on the Edit page
This is the method most people need.
- Switch to the Edit page (the Edit tab at the bottom of the screen, or Shift+4).
- Click Effects in the top-left toolbar to open the Effects Library.
- In the left column, open Toolbox > Titles.
- Drag Text (or Text+) onto the timeline, on a video track above the clip you want it over. If there's no empty track, drop it in the empty area above the top track and Resolve makes one.
- Drag the title's edges to set how long it stays on screen.
- Select the title and open the Inspector (top-right). Type your words in the text box.
- Set the font, size, color, and position in the Inspector, or drag the text around in the Viewer.
Hovering over a title in the Effects Library previews it in the Viewer, which is the quickest way to compare templates.
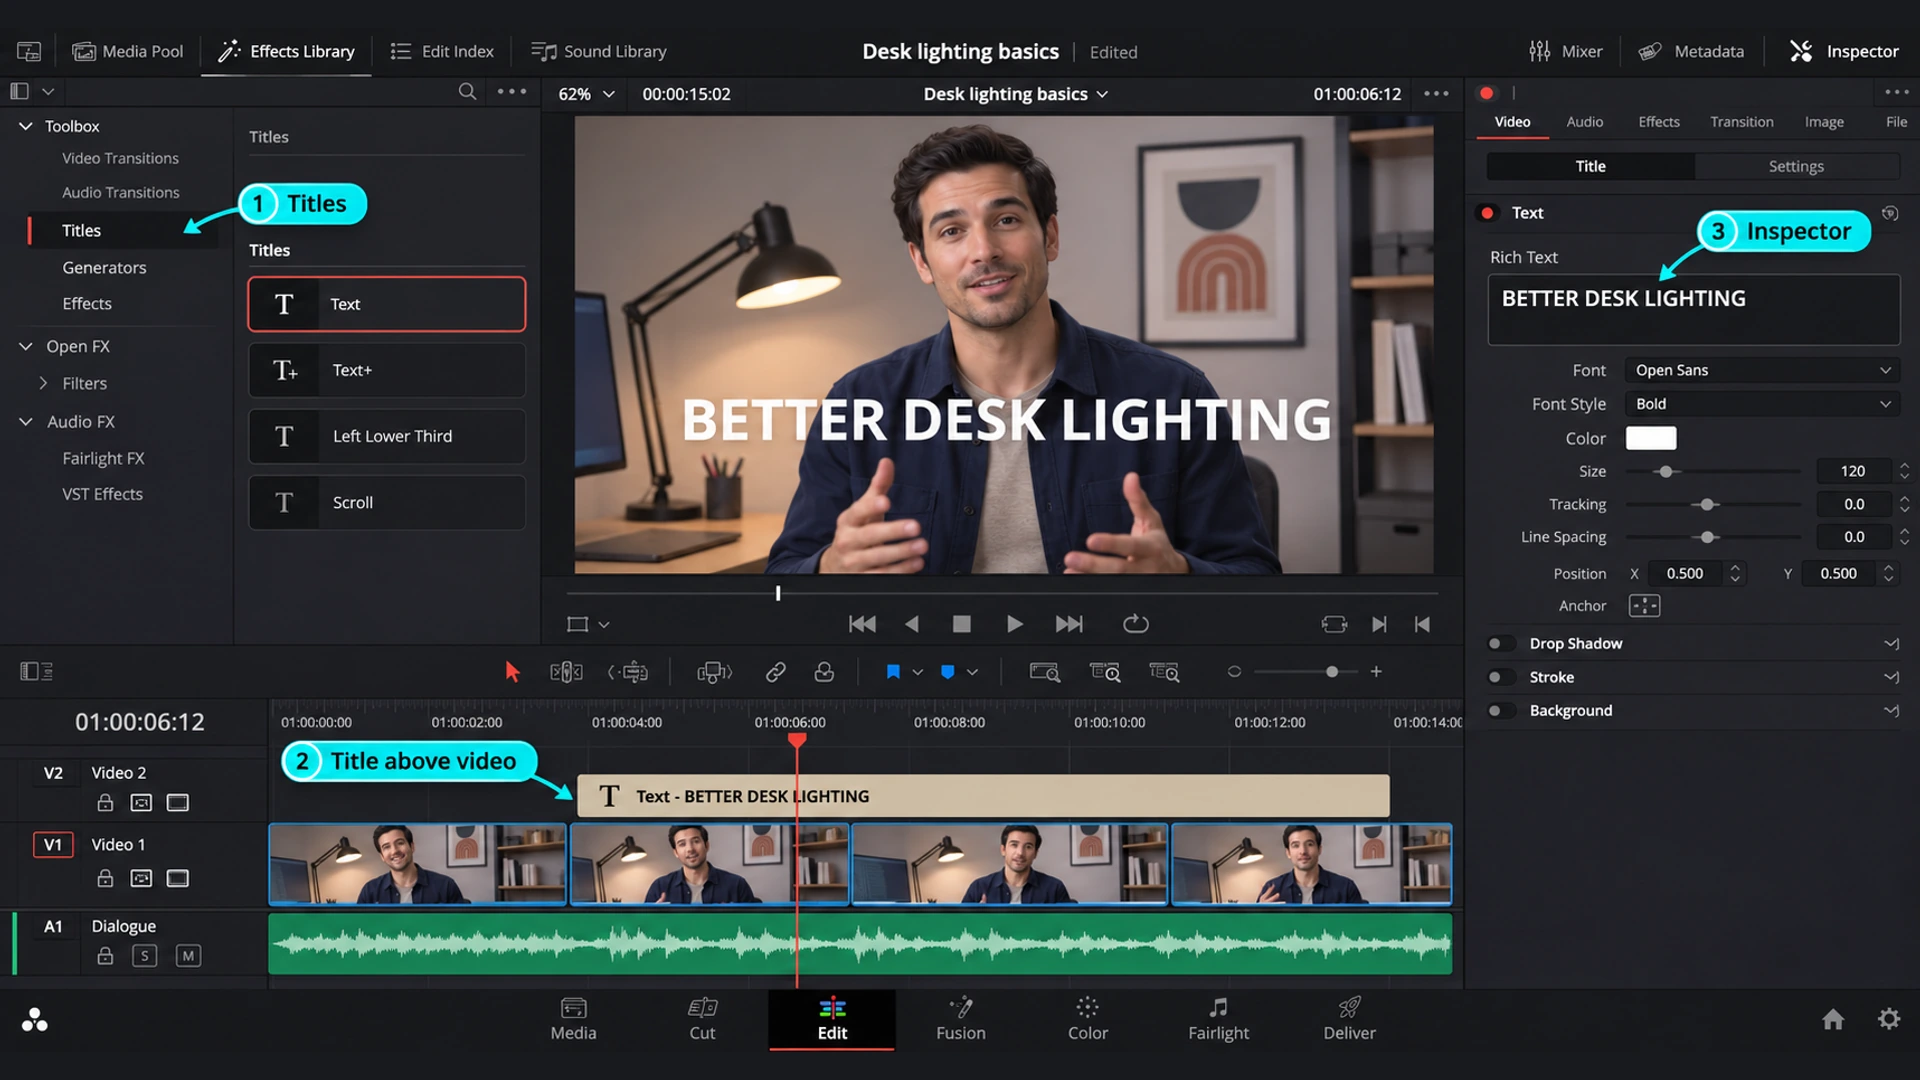
Editing plain Text in the Inspector
For a Text title, the Inspector's Title tab has the Rich Text box, where you can style individual words differently, followed by Drop Shadow, Stroke, and Background sections (Resolve manual). The Settings tab holds the usual clip controls: Composite, Transform, Cropping, and Dynamic Zoom. You can also double-click the text in the Viewer to type straight onto the frame.
Editing Text+ in the Inspector
A Text+ title opens in the Inspector with four sub-tabs:
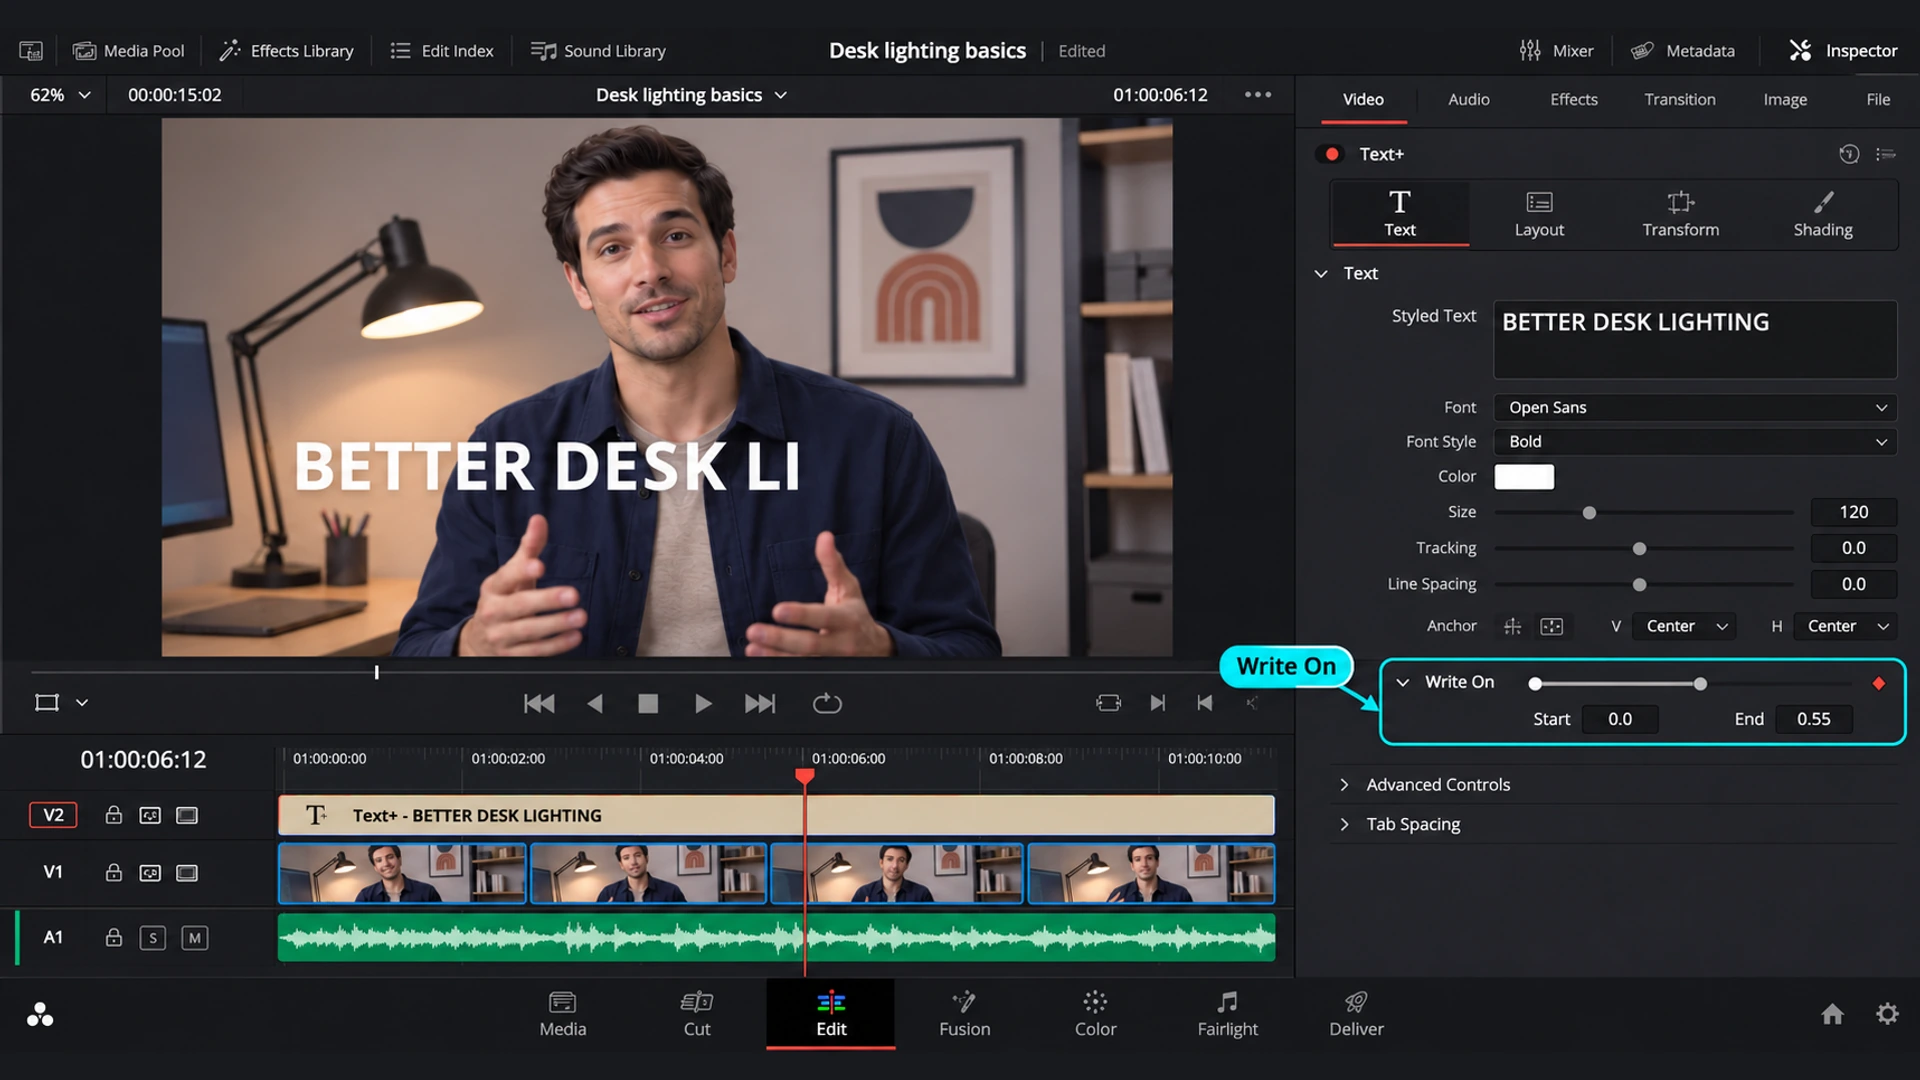
- Text: the words, font, size, tracking, line spacing, and the Write On range used for typewriter effects.
- Layout: position and layout type, including text on a circle or a path.
- Transform: per-character or per-word spacing, rotation, and shear (a fake italic).
- Shading: up to eight stacked style elements, such as a fill, an outline, a shadow, and a glow, each with its own color, opacity, and blur.
Text+ doesn't support rich text styling in the text box (Resolve manual). To color one word differently, use the Fusion page's character-level styling, or put that word in its own title.
How to add text on the Cut page
The Cut page is built for fast edits, and it has its own titles panel.
- Switch to the Cut page (Shift+3).
- In the top-left panel, click Titles (it sits next to Media Pool, Transitions, and Effects).
- Hover over a title to preview it, then drag it into either the upper or lower timeline (Shutterstock's Cut page guide).
- Select the title and open the Inspector to change the text, font, and position.
Both pages share the same timeline, so a title added on the Cut page shows up on the Edit page too. Most people add titles on the Cut page and fine-tune them on the Edit page, where the Inspector has more room.
How to use Fusion Titles and lower thirds
Fusion Titles are pre-built animated templates in Effects > Titles, below the basic titles. They include styles like Background Reveal, Call Out, and Scroll (Imagineer's title methods).
- In Effects > Titles, scroll to Fusion Titles.
- Hover to preview, then drag one onto a track above your clip.
- Select it and edit the text, colors, and timing in the Inspector.
- For deeper changes, right-click the title and open it in the Fusion page.
Adding a lower third
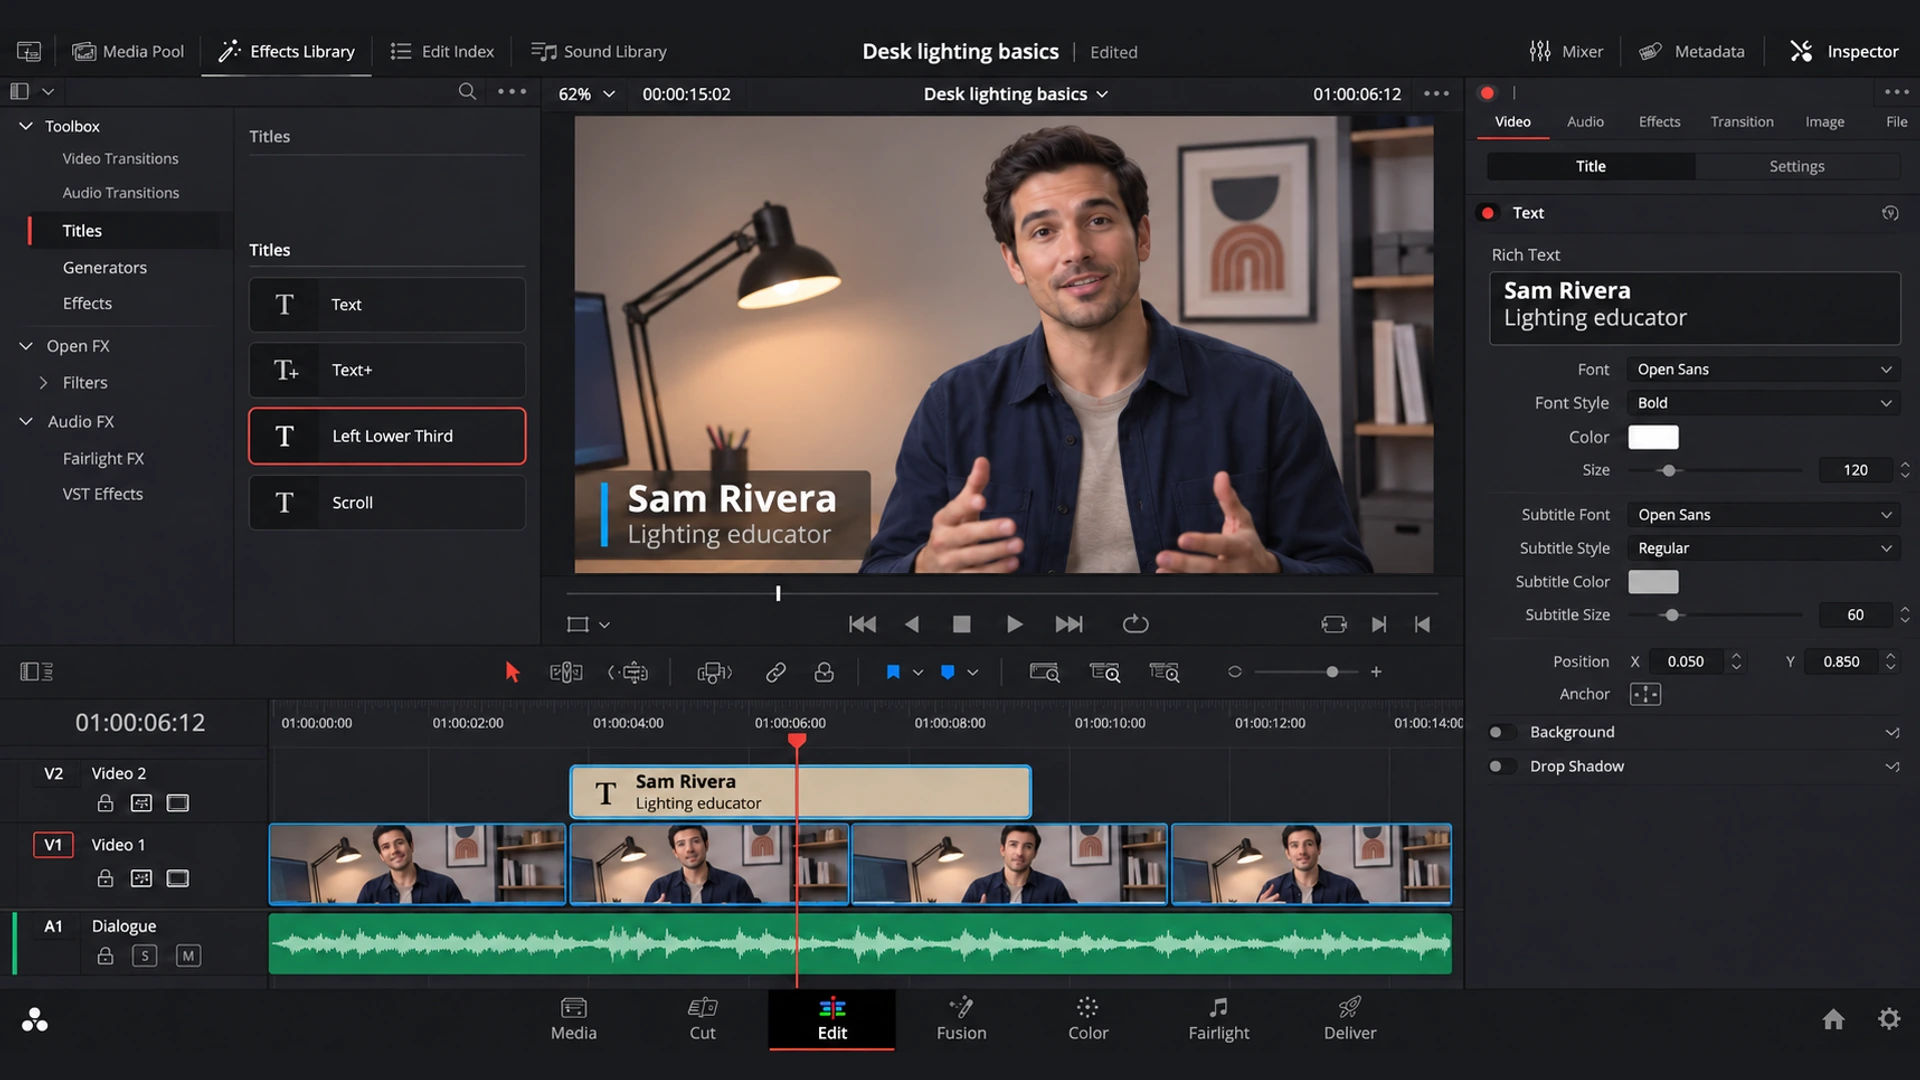
For a name and job title in the bottom corner, the basic titles include Left Lower Third, Middle Lower Third, and Right Lower Third. They come with two lines of text already laid out. Drag one above the interview clip, type the name and title, and keep it on screen for about four to six seconds. That's long enough to read twice without covering the speaker for the whole clip.
If you want a lower third that slides in, use an animated Fusion Title instead, or add position keyframes to a Text+ lower third (next section).
How to animate text in DaVinci Resolve
Fade or slide text with keyframes
This works with Text, Text+, and Fusion Titles.
- Move the playhead to where the animation should start.
- In the Inspector's Settings tab, click the diamond next to Position or Opacity to add a keyframe.
- Move the playhead a few frames later and change the value. Resolve adds a second keyframe automatically.
- Repeat at the end of the title for the exit.
For a simple fade, you don't even need keyframes: drag the small fade handles at the top corners of the title clip on the timeline.
Typewriter effect with Text+ Write On
- Add a Text+ title and select it.
- In the Inspector's Text tab, find Write On.
- At the start of the clip, set the end of the Write On range to 0 and add a keyframe.
- Move the playhead later and drag the range to its maximum. Resolve adds the second keyframe and the letters type on between them (TourBox).
Scrolling credits
Use the Scroll title from Effects > Titles. Type or paste your credits, and Resolve scrolls them across the clip's duration. Make the clip longer to slow the scroll down.
Per-character animation on the Fusion page
For bouncing letters, per-letter color, or text on a path, open the Text+ title on the Fusion page (Shift+5). Right-click the text field and enable Character Level Styling to unlock per-character controls in the Modifiers tab.
How to add subtitles in DaVinci Resolve
Subtitles live on their own track type, so viewers can turn them on or off, or you can burn them into the picture.
Typing subtitles manually (free and Studio)
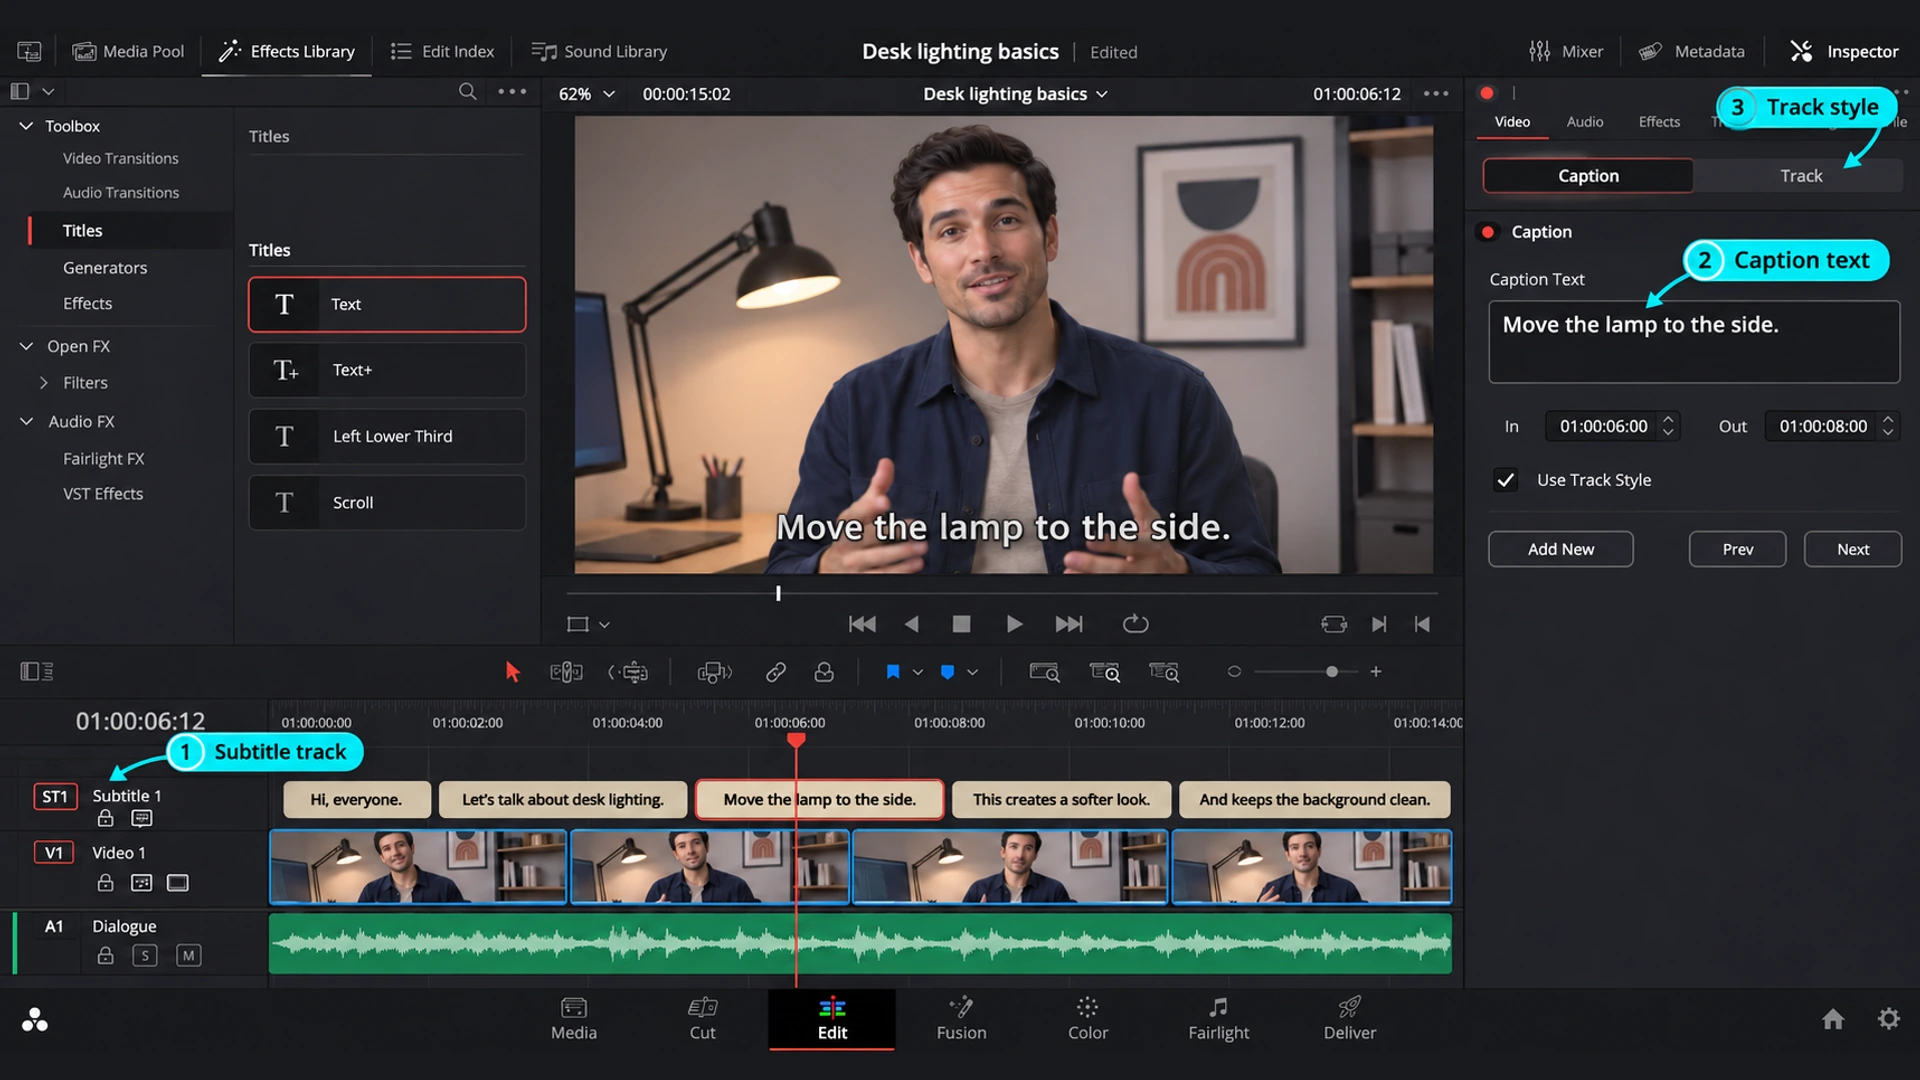
- On the Edit page, right-click above the timeline tracks and choose Add Subtitle Track, or open Effects > Titles and drag Subtitle to the top of the timeline.
- Select the subtitle and type the line in the Inspector's Caption field.
- Drag its edges so it matches the speech.
- Click Add New in the Inspector to create the next subtitle.
- Style the whole track (font, outline, drop shadow, background, position) in the Inspector's Track tab (Storyblocks guide).
You can also drag an existing .srt file onto the timeline and Resolve turns it into a subtitle track. If you don't have one yet, see how to create an SRT file on Mac.
Generating subtitles automatically (Studio)
Timeline > AI Tools > Create Subtitles from Audio transcribes your dialogue and builds a subtitle track in one step (Larry Jordan's walkthrough). This is a Studio feature: the free version doesn't include it (University of Texas guide, Storyblocks).
Since Resolve 20, you can also drag one of the Animated subtitle styles from Effects > Titles onto the subtitle track header to highlight or animate words as they're spoken. It applies to every subtitle on that track.
Exporting subtitles
On the Deliver page, open Subtitle Settings and check Export Subtitle. Choose Burn into video to make them part of the picture (needed for TikTok, Reels, and Shorts) or export them as a separate file for YouTube and other players that support closed captions. For more on burned-in captions, see how to burn subtitles into a video on Mac.
Styling tips that make text readable
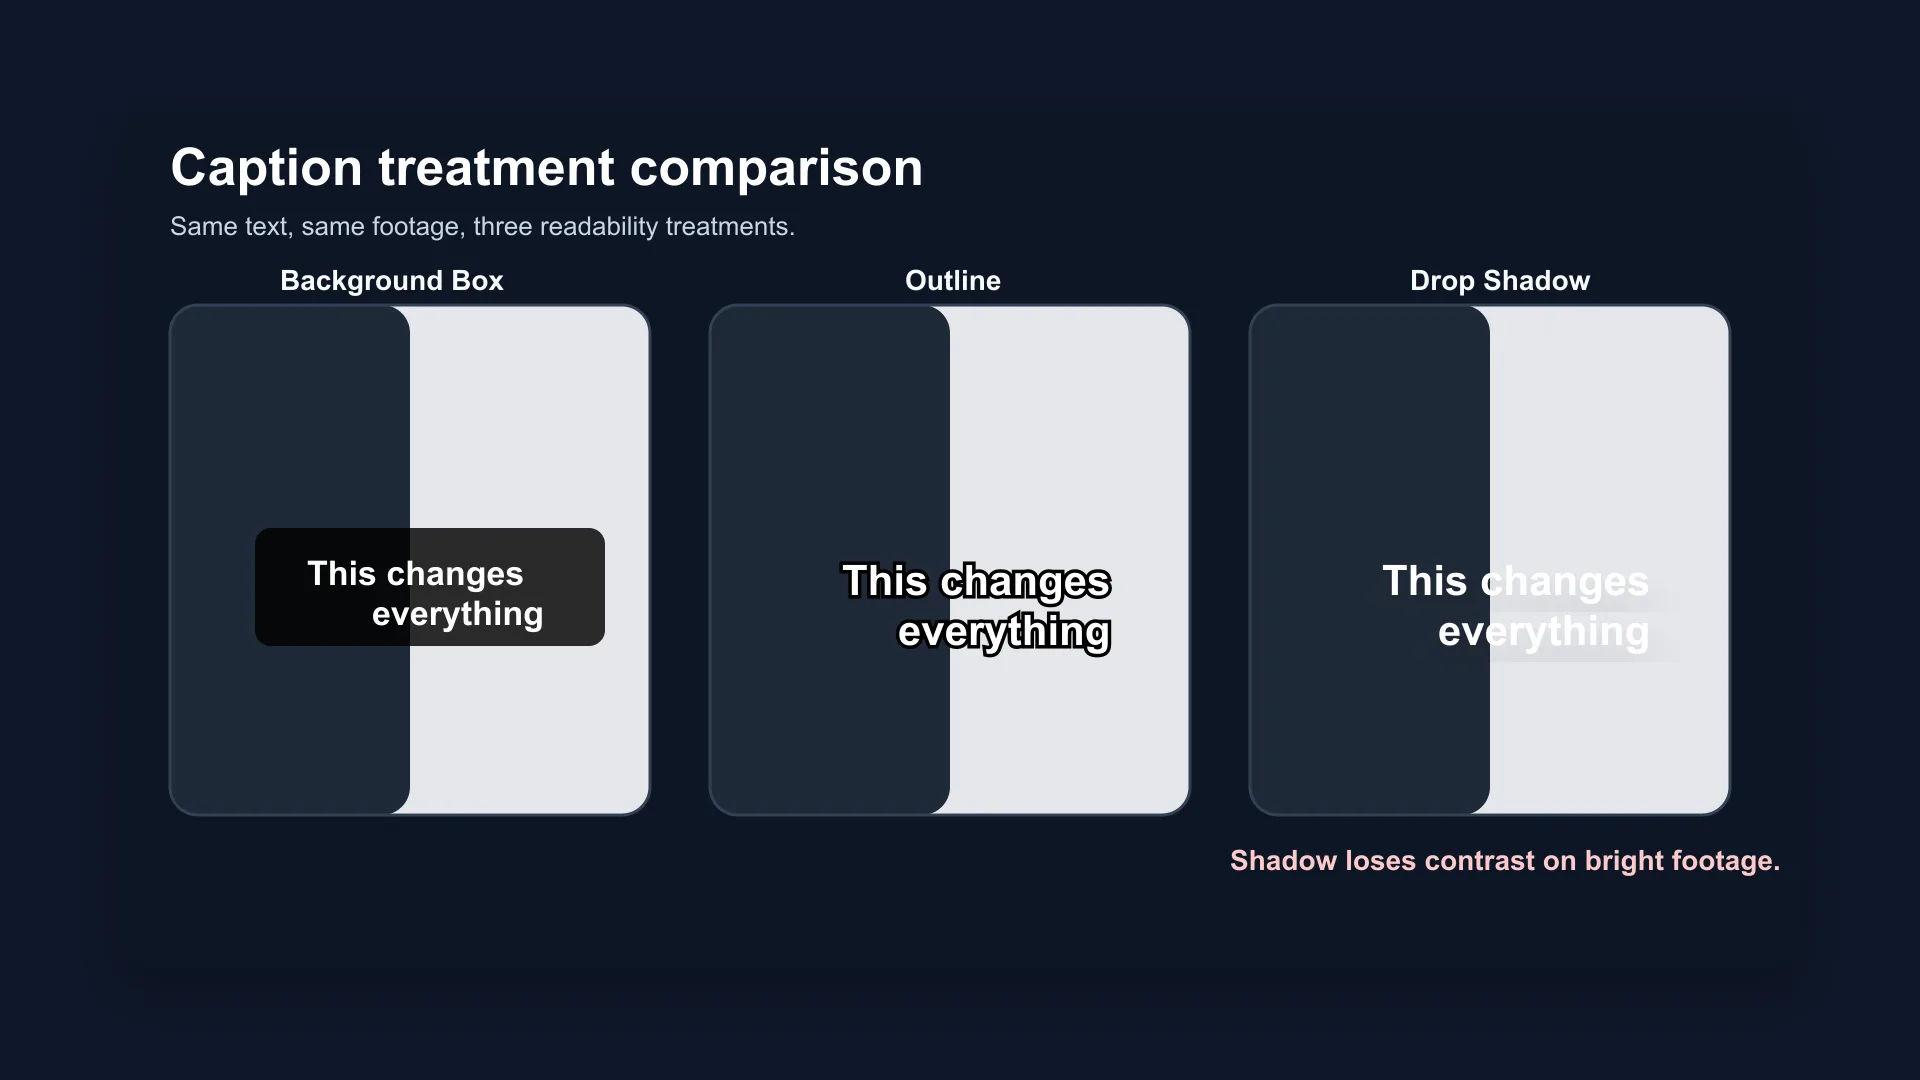
Most text in amateur edits fails for one reason: it's hard to read on top of moving footage.
- Pick a heavy sans-serif font. Thin weights flicker on phone screens. Montserrat, Inter, and similar fonts at Bold or Black weight hold up well. See the best fonts for video editing.
- Add contrast behind the letters. In plain Text, turn on Stroke or Background. In Text+, enable a second Shading element for the outline and a third for the shadow. Our background vs outline vs shadow comparison shows when each works.
- Keep text inside the safe area. Turn on View > Safe Area to see the title-safe guides. For vertical video, keep text clear of the bottom fifth of the frame, where TikTok and Reels put their own buttons.
- Stay consistent. Once a title looks right, copy it and use Paste Attributes (Option+V on Mac, Alt+V on Windows) to match others to it.
Common problems and fixes
| Problem | Likely cause | Fix |
|---|---|---|
| Text doesn't show in the Viewer | The title is on a track below the video, or the track or clip is disabled | Move the title to the top track. Check the track's enable button and make sure the clip isn't greyed out (press D to toggle a clip on or off) |
| Text is invisible but selected | Opacity at 0, white text over white footage, or the text sits outside the frame | Check Opacity and Position in the Inspector. Add a stroke or background |
| Can't type in a Text+ title in the Viewer | On-screen typing is off | Type in the Inspector's text box, or right-click the Viewer, choose Template, and enable Allow typing in preview |
| Can't move Text+ in the Viewer | The Fusion overlay is off | Turn on the Fusion Overlay in the Viewer's bottom-left menu, or change Position in the Inspector |
| A font is missing or looks wrong | Resolve reads fonts installed on your system | Install the font (Font Book on Mac, Settings > Fonts on Windows), then restart Resolve |
| Playback stutters on titles | Text+ and Fusion Titles are rendered live | Set Playback > Render Cache to Smart, or right-click the title and enable Render Cache Fusion Output |
| Subtitles don't appear in the export | Export Subtitle is unchecked on the Deliver page | Turn it on in Subtitle Settings and choose Burn into video |
| Can't find Create Subtitles from Audio | You're on the free version | Type subtitles manually, import an SRT, or upgrade to Studio |
Keyboard shortcuts for working with text
These are Resolve's defaults. On Windows, use Ctrl where Mac uses Cmd, and Alt for Option.
| Action | Shortcut |
|---|---|
| Cut page | Shift+3 |
| Edit page | Shift+4 |
| Fusion page | Shift+5 |
| Deliver page | Shift+8 |
| Selection mode | A |
| Blade mode | B |
| Split clip at playhead | Cmd+B |
| Duplicate a title | Option-drag it on the timeline |
| Paste attributes from a copied title | Option+V |
| Enable or disable a clip | D |
| Zoom timeline to fit | Shift+Z |
Free vs Studio: what changes for text?
Text, Text+, Fusion Titles, lower thirds, manual subtitles, SRT import, and subtitle export all work in the free version. The text-related differences in DaVinci Resolve Studio are the AI tools: Create Subtitles from Audio needs Studio, and Blackmagic lists the DaVinci Neural Engine AI tools among the Studio-only features (Blackmagic's Studio page). Studio also raises the free version's UHD and 60fps limits.
Studio is a one-time purchase with a $295 list price; Blackmagic's store showed it at $236 when we checked in November 2026. If auto subtitles are the only Studio feature you'd use, compare that price against a dedicated captioning tool first.
A faster option for captions on talking-head videos
Resolve's titles are flexible, but they're manual: every line of on-screen text is a clip you place, time, and style. For videos of someone talking to the camera, where you want captions on every sentence, that adds up fast, and automatic subtitles need Studio.
BlitzCut handles that part automatically on Mac, iPhone, and iPad. It transcribes the speech and adds word-by-word animated captions with styles, fonts, colors, outlines, and shadows, and you fix any wrong word by editing the transcript. It also removes silences and lets you cut retakes by deleting text, and exports have no watermark. It's free to download with a 3-day trial.
Plenty of editors use both: BlitzCut for the speech edit and captions, and Resolve for grading and anything that needs a full timeline. See BlitzCut vs DaVinci Resolve for the details, or DaVinci Resolve text-based editing if you want to cut by transcript inside Resolve. If you're still choosing an editor, our Final Cut Pro vs DaVinci Resolve comparison covers the bigger picture.
Frequently Asked Questions
How do I add text in DaVinci Resolve for free?
Everything needed to add text is in the free version. On the Edit page, open Effects > Titles, drag Text or Text+ above your clip, and type in the Inspector. Only automatic subtitle generation from audio needs Studio.
What's the difference between Text and Text+ in DaVinci Resolve?
Text is a simple title with rich text, stroke, drop shadow, and a background box, edited in the Inspector. Text+ is built on Fusion, with layout options, per-character spacing, up to eight shading layers, the Write On animation, and full editing on the Fusion page. Use Text for quick titles and Text+ when you need styling or animation.
How do I move text in DaVinci Resolve?
For a Text title, drag it in the Viewer or change Position in the Inspector. For Text+, either change Position in the Inspector's Layout tab or turn on the Fusion Overlay in the Viewer so you can drag it.
How do I add an outline or drop shadow to text in DaVinci Resolve?
In a Text title, turn on Stroke for an outline and Drop Shadow for a shadow in the Inspector's Title tab. In Text+, go to the Shading tab, select the second element and enable it for an outline, then enable the third for a shadow. Each element has its own color, thickness, softness, and opacity.
How do I add text over a video in DaVinci Resolve?
Put the title on a video track above the clip. Resolve layers tracks from the top down, so a title on Video 2 appears over a clip on Video 1. If your text isn't showing, it's usually on a lower track than the footage.
Can DaVinci Resolve add captions automatically?
Yes, in DaVinci Resolve Studio: Timeline > AI Tools > Create Subtitles from Audio builds a subtitle track from your dialogue. In the free version, type subtitles manually or import an SRT file.
How do I make scrolling text in DaVinci Resolve?
Drag the Scroll title from Effects > Titles onto the timeline and type your text. The scroll speed depends on the clip length, so extend the clip to slow it down and shorten it to speed it up.
Related: DaVinci Resolve Text-Based Editing · BlitzCut vs DaVinci Resolve · Final Cut Pro vs DaVinci Resolve · Best Fonts for Video Editing · Caption Background vs Outline vs Shadow
Editing a talking-head video?
BlitzCut is available on Android, iPhone, iPad, and Mac. It is designed for recorded UGC-style videos, founder-led ads, tutorials, and testimonials and other talking-head content.
Try it for freeRelated Articles
Keep Reading

How to Add Captions to Instagram Reels (Automatically)
How to add captions to Instagram Reels: use the Captions sticker for free auto captions, or burn in styled word-by-word captions with Edits, CapCut, or BlitzCut. Steps for each.

How to Add Captions to a Podcast Video on Mac
How to add captions to a podcast video on Mac: burned-in captions for TikTok, Reels, and Shorts clips, and SRT subtitles for full YouTube episodes. Steps for BlitzCut, Descript, and Final Cut Pro.

How to Add Subtitles to a Video on Mac (Automatically)
How to add subtitles to a video on Mac automatically with Final Cut Pro, Premiere Pro, CapCut, or BlitzCut, plus a free method using MacWhisper and HandBrake. iMovie can't do it.