Video Editing Workflow for Beginners on Mac (2026 Guide)
Mac video editing workflow for beginners in 2026 — import, cut, add captions, and export. Step-by-step with the right tool at each stage.

A video editing workflow for Mac beginners in 2026 has five stages: import, rough cut (silence and filler removal), polish (b-roll and transitions), captions, and export. The fastest beginner path is BlitzCut for talking-head content — it automates the rough cut stage entirely, reducing a 2-hour editing session to 20 minutes. iMovie and Final Cut Pro handle more complex edits but have steeper learning curves.
Learning video editing can feel overwhelming because there are too many tools, too many tutorials, and no clear starting point.
This guide gives you the starting point: a practical, stage-by-stage workflow optimized for beginners editing on a Mac. It covers what to do at each stage, which tool to use, and how to avoid the most common beginner mistakes.
What a Video Editing Workflow Actually Is
A workflow is just the order of operations — what you do first, second, and third. The reason workflows matter is that editing in the wrong order wastes time. You can spend an hour adding transitions, then realize you need to cut 5 minutes from the middle, which breaks every transition you built.
The correct order prevents that.
The five stages of a basic video editing workflow:
- Import and organize — Get footage from your camera or phone onto your Mac
- Rough cut — Remove silence, filler words, and bad takes
- Polish — Add b-roll, transitions, music
- Captions — Add subtitles for accessibility and social performance
- Export — Render and save in the right format for each platform
Most beginners skip stages or do them out of order. The result is slow, frustrating editing sessions that feel longer than they should.
Stage 1: Import and Organize
Before you can edit, your footage needs to be on your Mac and accessible.
Getting Footage onto Your Mac
From iPhone: Connect via USB or use AirDrop for smaller files. For regular workflows, use iCloud Photos with "Download Originals" enabled — footage syncs to your Mac automatically.
From camera: Connect via USB-C or SD card reader. Macs with M-series chips have no built-in SD card slot except the MacBook Pro 14" and 16" — you'll need an adapter for other models.
From external recording: Zoom, Riverside, or Loom downloads go directly to your Downloads folder. Move them to a dedicated project folder first.
Folder Structure for Beginners
A simple folder structure prevents lost footage:
/Videos
  /[Project Name]
    /raw         ← original files, never edit these
    /exports     ← finished video files
    /assets      ← music, b-roll, graphics
Keep raw files separate. This way, if something goes wrong in editing, you always have the original to start over from.
Recommended Import Tools
- iPhone to Mac: iCloud Photos or AirDrop
- Camera: Finder drag-and-drop into project folder
- Remote recordings: Download directly from recording platform
Which Editor to Start With
For absolute beginners: iMovie (free, pre-installed on every Mac) handles drag-and-drop timelines, 4K footage, and direct YouTube export. For beginners who want to grow into a professional tool: DaVinci Resolve is free with a powerful feature set including color correction, audio mixing (Fairlight), and visual effects. It has a steeper learning curve than iMovie but is the most capable free editor available on Mac.
Stage 2: The Rough Cut (Most Important Stage)
The rough cut is where you transform raw footage into watchable video. It's also where beginners lose the most time.
Raw footage from a 15-minute recording session is unwatchable. It contains:
- Long silences at the start and end
- Dead air between sentences
- Filler words: uh, um, you know, like
- False starts and retakes
- Moments where the speaker loses their train of thought
The rough cut removes all of this. Everything else in editing is built on top of the rough cut — which is why it comes first.
The Manual Rough Cut (Traditional Method)
In iMovie or Final Cut Pro, the manual rough cut looks like this:
- Import the video into the timeline
- Play from the beginning
- Pause when you find silence or a bad take
- Use the blade tool to cut at both ends of the bad section
- Select and delete the segment
- Close the gap
- Repeat until you've cleaned the whole video
For a 15-minute recording, this takes 60–90 minutes. For beginners who aren't yet fast with keyboard shortcuts, it can take longer.
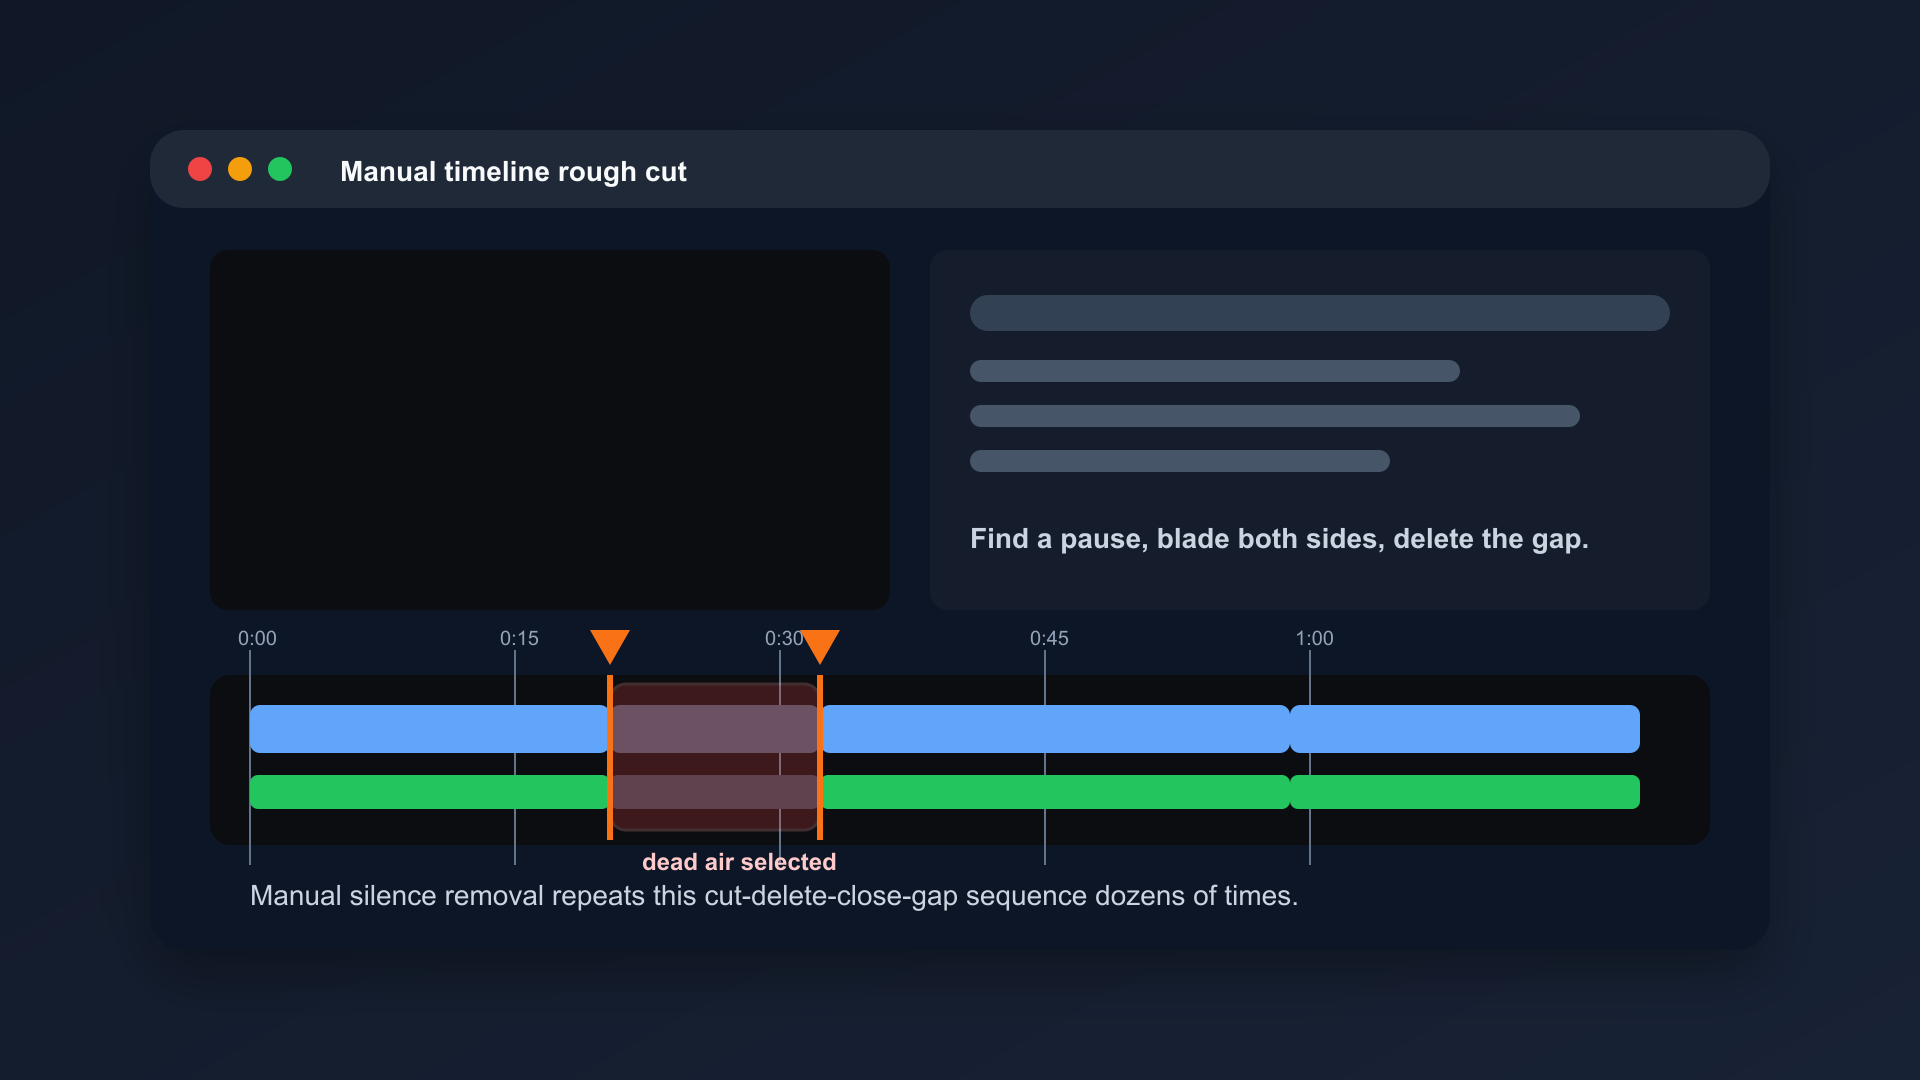
Manual silence removal in a timeline editor: blade tool on each side of a dead air gap, select, delete, close the gap. For a 15-minute recording this sequence repeats 60–120 times.
The Automated Rough Cut (AI Method)
BlitzCut, available on Mac from the App Store, automates the rough cut stage:
- Import your video into BlitzCut
- Tap Remove Silence — BlitzCut detects and removes all dead air automatically
- Review the transcript — delete filler words by selecting them in the text view
- Done
The same 15-minute video takes 5–10 minutes in BlitzCut. This is not a small difference — it's the difference between editing feeling like a chore and editing feeling manageable.
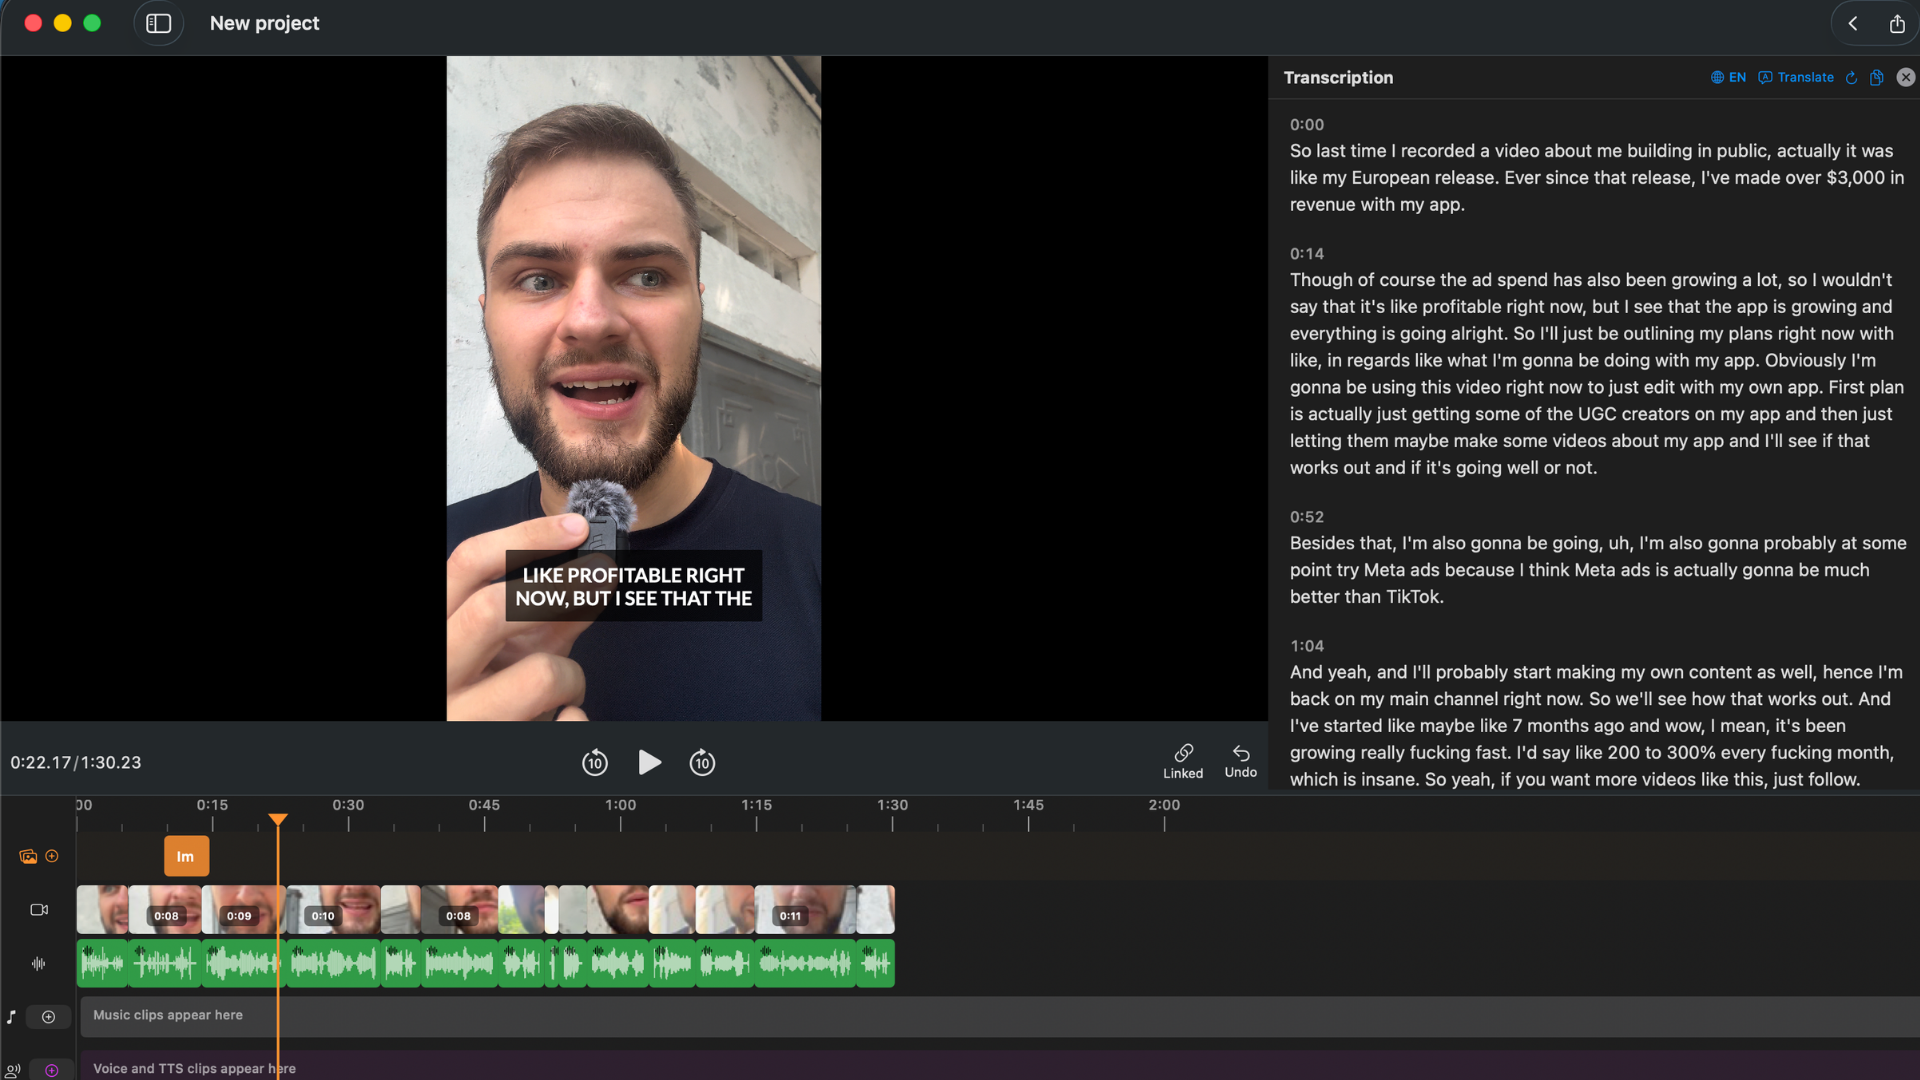
BlitzCut after silence removal. Every spoken word is visible as editable text — filler words like "um" and "you know" are immediately visible and can be deleted by selecting them in the transcript.
For beginners making talking-head content (tutorials, vlogs, explainers, social videos), starting with BlitzCut is strongly recommended. You learn the process without getting stuck on the slow manual work.
When to use BlitzCut: Talking-head videos, vlogs, tutorials, podcast clips, social content, anything where a person is speaking directly to camera.
When to use iMovie/Final Cut manually: Complex multi-camera setups, music videos, heavily scripted productions with minimal cutting needed.
Stage 3: Polish (B-Roll, Transitions, Music)
Once your rough cut is done, the video is watchable but still feels like a raw recording. Polish adds production value.
B-Roll
B-roll is supplementary footage that plays over your main talking-head footage. It shows what you're talking about instead of just your face.
For example, if you're explaining how to edit video, you'd cut away from your face to a screen recording of the editing software while you continue talking.
Sources of b-roll for beginners:
- Screen recordings (for tutorial content)
- Pexels.com and Pixabay — free stock video
- Your own smartphone footage of relevant subjects
- Product shots, demos, close-ups
How to add b-roll in iMovie:
- Import b-roll clip to iMovie
- Drag it to the timeline above your main video track (the Storyline)
- Trim to the exact length you need
- The b-roll plays over your main audio automatically
How to add b-roll in Final Cut Pro:
- Import to Event browser
- Drag to the timeline as a connected clip above the Primary Storyline
- Trim and adjust
Transitions
Beginners often over-use transitions. The only transition you need 90% of the time is the cut — no transition at all. Direct cuts feel clean and fast.
Use dissolves and fades sparingly:
- Dissolve: Shows passage of time between clips
- Fade to black: Signals the end of a chapter or section
- Cut: Everything else
Music
Background music sets tone and fills awkward silences.
Legal music sources for creators:
- YouTube Audio Library (free, no attribution required for most tracks)
- Epidemic Sound ($13/month, unlimited licensing)
- Artlist ($14.99/month, unlimited licensing)
- Pixabay Music (free)
Set music volume to 10–20% of your main voice volume. It should be barely audible — present but not competing with speech.
Stage 4: Captions
Captions are no longer optional for social video in 2026. Here's why:
- 85% of Facebook video is watched with sound off (Facebook internal data)
- Captions increase average watch time on TikTok and Reels by 12–40% depending on content type
- Captions are required for accessibility compliance for many creators and businesses
- YouTube auto-captions are often inaccurate — your own captions look more professional
How to Add Captions on Mac
BlitzCut: Generates accurate auto-captions with styled text and animation. Fastest option for social videos. Export includes captions burned into the video.
iMovie: iMovie has very limited caption/subtitle support. You can add text overlays manually, but this is not scalable for full transcripts.
Final Cut Pro: Supports proper subtitle tracks via Captions > Add Caption. Supports SRT import and CEA-608 captions. Better for professional accessibility compliance.
CapCut: Strong automatic captions with styling options. Free, but web/mobile-first.
For most beginners making social content, BlitzCut's auto-captions are the fastest path. For YouTube long-form content with accessibility requirements, Final Cut's caption track support is more robust.
Stage 5: Export
Export settings determine file size, quality, and compatibility. Getting them wrong means either huge files that take hours to upload, or compressed files that look terrible.
Export Settings by Platform
| Platform | Format | Resolution | Frame Rate | Notes |
|---|---|---|---|---|
| YouTube (standard) | MP4 (H.264) | 1920×1080 | 24 or 30fps | 1080p minimum |
| YouTube (4K) | MP4 (H.265) | 3840×2160 | 24–60fps | Larger file, higher quality |
| TikTok | MP4 | 1080×1920 (9:16) | 30fps | Vertical, max 10 min |
| Instagram Reels | MP4 | 1080×1920 (9:16) | 30fps | Vertical, max 90 sec |
| YouTube Shorts | MP4 | 1080×1920 (9:16) | 30 or 60fps | Vertical, max 60 sec |
| X / Twitter | MP4 | 1280×720 minimum | 30fps | 2 min 20 sec max |
Exporting from BlitzCut
BlitzCut exports in your original resolution. Select aspect ratio (16:9 horizontal or 9:16 vertical) before exporting. BlitzCut handles format and compression automatically.
Exporting from iMovie
Go to File → Share → File. Set:
- Format: Video
- Quality: High (for YouTube) or Custom (to set specific settings)
- Compress: Better Quality
- Resolution: 1080p or 4K depending on your source
Exporting from Final Cut Pro
File → Share → Master File gives you maximum quality. For platform-specific exports, use File → Share → [Destination] — Final Cut has built-in YouTube and Vimeo export destinations that apply correct settings automatically.
Complete Beginner Workflow (Summary)
Here's the full beginner workflow on Mac, tool by tool:
Workflow A: Social Content (TikTok, Reels, Shorts)
- Record on iPhone or camera
- AirDrop or cable transfer to Mac
- BlitzCut → silence removal → filler word edit via transcript → auto-captions → vertical export
- Upload directly to platform
Total time: 15–30 minutes for a 5–10 minute video.
Workflow B: YouTube Tutorial or Vlog (10–30 min)
- Record on camera or iPhone
- Transfer to Mac project folder
- BlitzCut → silence removal → filler word edit → export clean rough cut
- iMovie or Final Cut → add b-roll → music → titles
- Export at 1080p MP4
- Upload to YouTube → add transcript for captions → add chapter markers
Total time: 45–90 minutes for a 20-minute finished video.
Common Beginner Mistakes (and How to Avoid Them)
Mistake 1: Editing at 1x speed from the start.
Always skim at 1.5–2x speed first. You'll find the structure faster and won't lose time on sections you'll eventually cut entirely.
Mistake 2: Adding music and transitions before cutting.
Always rough cut first. Transitions applied to clips you later delete waste time and create sync problems.
Mistake 3: Exporting in the wrong resolution.
Exporting a vertical video (9:16) as horizontal (16:9) adds black bars and looks amateurish. Know your target platform before exporting.
Mistake 4: Using iMovie for content it wasn't designed for.
iMovie works for basic edits. For silence removal, filler editing, or captions, it's the wrong tool. Use a purpose-built tool like BlitzCut for those tasks.
Mistake 5: Perfectionism at the rough cut stage.
The rough cut doesn't need to be perfect — it needs to be done. Cut the obvious problems and move on. Polish comes later.
Frequently Asked Questions
What's the easiest video editing app for beginners on Mac?
For talking-head video (tutorials, vlogs, social clips), BlitzCut is the easiest — it automates the hardest part (silence and filler removal) with one tap. For more general editing including multi-clip timelines, iMovie is free and beginner-friendly.
Do I need Final Cut Pro as a beginner?
No. Final Cut Pro at $299 is worth it once you've outgrown iMovie and have a regular publishing schedule. As a beginner, iMovie and BlitzCut cover everything you need.
How long should editing take for a 10-minute YouTube video?
With AI tools: 30–45 minutes for a polished final cut. Manually without AI: 90–120 minutes. The rough cut (silence and filler removal) is where most of the time goes — automating it with BlitzCut makes the biggest difference.
Can I edit video on Mac without spending money?
Yes. iMovie is free on all Macs. BlitzCut offers a 3-day free trial. YouTube Audio Library has free music. Pexels has free b-roll. A beginner can build a complete free editing workflow on Mac.
What Mac do I need for video editing?
Any Mac with Apple Silicon (M1, M2, M3, M4) handles 1080p and 4K editing well. Older Intel Macs work for 1080p but are noticeably slower rendering 4K. For most beginners, whatever Mac you have is sufficient for getting started.
The beginner video editing workflow on Mac has never been faster or more accessible than it is in 2026. AI tools automate the slow parts. iMovie handles the timeline. And you can publish professional-looking videos without years of editing experience.
Start with the rough cut. Everything else builds on top of it.
Download BlitzCut for Mac — automate your rough cut and cut your editing time in half.
Post every day without spending hours editing
BlitzCut is a native App Store app for iPhone, iPad and on Mac. Get from raw footage to TikTok-ready in under 2 minutes, so editing is never the reason you didn't post.
Download BlitzCut on the App StoreRelated Articles
Keep Reading

Best Podcast Clip Makers in 2026 (Honest Comparison)
The best podcast clip makers compared: Opus Clip, Vizard, Riverside, Descript, and BlitzCut — ranked by how you actually clip, with real tradeoffs and pricing.

Best Teleprompter Apps for iPhone in 2026 (Tested)
The best teleprompter apps for iPhone: Teleprompter Premium, PromptSmart Pro, BIGVU, and free options compared — plus the editing step that makes prompter footage watchable.

How to Edit a VSL That Converts (2026 Guide)
How to edit a video sales letter: cut dead air, tighten the script after recording, add captions for muted autoplay, and pace the pitch — with the exact workflow.